

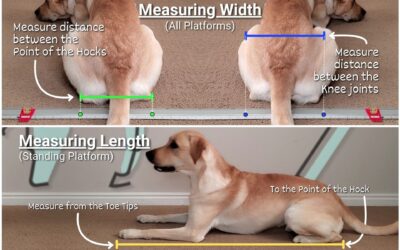
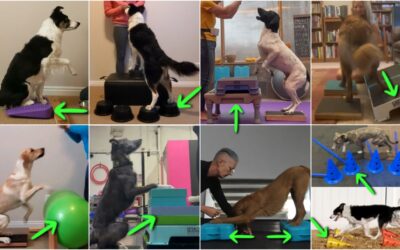
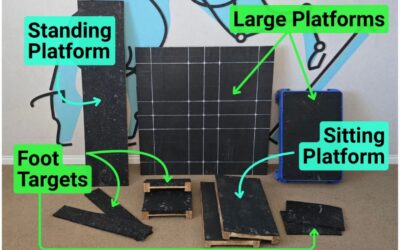
This blog post is part 3 of a 3 part series and covers the “HOW” of building platforms for canine fitness. This method is simple and inexpensive and can actually be executed without any tools or any special skills. This formula can be applied to any canine fitness platform including Sitting Platforms, Standing Platforms and Foot Targets. The description of each of these platforms and what they’re good for is discussed in Part 1 of this series, and measuring for these platforms is converted in Part 2 of this series.
Steps for building canine fitness platforms
In this Video I will walk you through how to…
- Locate the correct width of dimensional lumber in the hardware store
- Double check this is the correct width for your dog
- Select the perfect piece of wood to build your canine fitness platform
- Cut the piece of wood in store or at home
- Gathering the needed tools and supplies
- Sanding the cut platform
- Tips & Tricks to apply the grip tape to your platform correctly
Supplies you’ll need
- Piece(s) of wood the correct width and length for your various platforms
- Saw, measuring tape / ruler, pencil and safety glasses (only if you’re cutting at home)
- Grip Tape
- Scissors
- Sandpaper or sanding block
- Damp cloth
- Scrap piece of wood or other hard hand held object

The first phase includes…
1. Locating the correct size lumber
When building platforms for canine fitness, the first step is locating the correct width of wood in the lumber isle of your hardware store. So as you walk down the aisle, look for the labels that correspond with your predetermined width.
Keep in mind dimensional lumber has been milled down from it’s original width and depth, so the actual width is going to be about half an inch smaller that the width listed

2. Testing the fit
If your dog falls between widths, or you were unable to get a good measurement, it can be helpful to have your dog “try on” the piece of wood before cutting and building your canine fitness platform. I brought Ron Burgundy along with me to the store to test things out.

Here he is on a 2×12 . You can see how he fits on the platform easily with just a bit of extra space outside the point of the hock and the elbows.

In contrast, here is Ron Burgundy on a 2×10. You can see how he is struggling to fit on the platform, and the point of the hock and elbows are way too close to the edge.
The reason we are building platforms vs buying something premade is so we can customize the platform size. We don’t want the platforms to be too wide, as they won’t have a positive impact on form… And we don’t want them to be too narrow, as they will then create incorrect movement patterns and frustrate our dogs.
3. Selecting the perfect piece
When selecting the piece of lumber to build our canine fitness platforms, we want to avoid wood with knots and warps, as that will result in a tippy, wobbly platform. One easy technique to determine if a board is “true” is to look down the edge of the piece of lumber and look for any twisting, bending or warping.
Another consideration is how much length do you need to make all your desired platforms? If you do your math right you can cut all your Sitting Platforms, Standing Platforms, and Foot Targets all from the same piece of wood, with only one trip to the store! A little bit of forethought can make building platforms for canine fitness training simple and efficient… while minimizing waste and frustration.

4. Cutting at the store?
The next thing to consider is if we are going to have the platforms cut for us at the store? Or bring the wood home and cut the platforms yourself. Most hardware stores have a cutting station, and will make a few cuts for you for free with a small charge for additional cuts. This might be worth the small expense if you don’t already have the tools at home, or if the length of lumber you need won’t easily fit in your vehicle. Just make sure to have the dimensions of each cut worked out and available to make things as easy and smooth as possible.
NOTE: While you’re at the store, it might be a good idea to pick up some sand paper and grip tape if you don’t have those items already.

The Second phase of building your canine fitness platforms includes…
1. Cutting at home?
If you’re cutting your platforms at home, premeasure your cuts, and take extra time to make sure the guidelines are straight. This will make stacking the platforms much nicer, and your dog will have a consistent vertical surface to navigate. Measure twice, cut once!! Prepare your saw and make the cuts.

2. Sanding
The next step in building your platforms is to sand all the edges and corners to eliminate the sharp milled edges, smooth out the cut sides and eliminate the chance of getting any splinters. When building platforms for canine fitness, these small touches make all the difference! Remember you’re going to be using these platforms frequently, and for a long time… so taking the time to make things nice is really worth it.

3. Applying Grip Tape
A. The first step is to measure the grip tape and add a few extra inches so the grip tape can be wrapped around the edge and affixed to the bottom of the platform. This will make the top surface non-slip of course, but also improve the traction between the platform and the ground itself. Once the proper length is determined, use the first piece as a template for cutting the other pieces.

B. This is where we need to focus! We have one chance to get the grip tape on straight, centered, and without any wrinkles. If we apply the tape in an intentional way we can then use the seams between the pieces of tape to determine if the dog is square, straight and centered. Wrinkled tape or big gaps will provide inconsistent feedback for your dog, and can lead to a lot of frustration for both you and your dog.
I always start in the center first and then apply the outside pieces second. When applying the grip tape, PRESS don’t RUB!! The grip tape is… well… grippy! Rubbing will turn your hands into hamburger meat. I actually use a scrap piece of wood to apply firm pressure across the whole surface.

C. The last step in the process is folding the edges under, folding corners nicely (like you’re wrapping a present), and using your scrap piece of wood to ensure you get a good adhesion between the grip tape and the platform edge. This will prevent dog hair and other debris from getting stuck to the platform, and keep things nice and tidy.

Finished Sitting Platform!
That’s it!! You did it! Who knew building your own platforms could be so easy!?! And this same formula can be applied to building all platforms for canine fitness… Sitting Platforms, Standing Platforms, and Foot Targets.
Have questions? Comment below!

Great video!
Hey thanks!! I’m glad you found it helpful!! And you should have seen the crowd Ron Burgundy attracted laying on the planks in the hardware store!
He held his down stay like PRO! Everyone applauded afterwards! 🤣🤣
This is the best series! I have a weekend to do now 😀 Thank you so much!
I’m glad you found it helpful!!! And good luck building them this weekend! Let me know if you run into any issues or you need help!
Great blog post!
Would artificial grass or a piece of carpet work instead of grip tape?
Hey! Thanks!!
Artificial turf and carpet can be a little bit slippery/unstable sometimes… So I would be a bit hesitant to use those materials. But rubber flooring, or yoga mat could definitely work!
Good to know. Since my dog drags his feet, I was concerned about the grip tape tearing his pads. I’ll grab yoga mats!
Thanks so much for sharing these videos; I greatly appreciate you taking the time to do this. I have a question if you don’t mind:
Since it would be a lot cheaper when making all the platforms, would adding a texture additive like Valspar’s Anti-skid Floor Texture additive to paint and then painting the surface work ok instead of using the grip tape?
https://www.lowes.com/pd/Valspar-Interior-Exterior-Concrete-Additive-Actual-Net-Contents-3-0/1000380867
It wouldn’t give the lines that you mentioned but I think I could use a Sharpie for that…?
Thanks again!
Hey Sue! Thats a great question!
I’m not super familiar with that specific product… But I have experience with other similar products, and I still find the paint approach a bit slippery for my “ultra safety conscious” approach. But maybe you could test both and see if they are similar.
Also, I have had a lot of success with Faber-Castell Pitt Artist Pen in white. It’s a permanent, waterproof India Ink, and is very opaque even over my black grip tape. It’s what I used to draw the lines on my Large Square Platform / rocker board.
What a great blog post. Not sure I was willing to admit that I was mostly intimidated by the wood buying at the hardware store. This makes it feel very doable!
Hey Anne!
Building stuff can certainly feel intimidating. But it really can be simple if the steps are broken down! I’m glad this blog post helped!!
Hi Anna,
Thanks for this detailed video.
How do we construct the foot targets like in your videos? Or can we use any thick piece of wood?
Hey Lana!
I actually built the foot targets shown in the video out of laminated I-beams I found at a local construction site. They were scrap pieces, and we’re going to be thrown away… So I ran on to the construction site in my flip-flops and asked if I could have them 😆
But any piece of thick wood would be totally fine. That would be the simplest solution. Alternatively, you could use a thin piece of wood like a 1×10 or 1×12 and add little feet.
I try and repurpose scrap wood I already have into foot targets… I have a lot of scrap wood left over from other projects I’ve done. I hope that answers your question!
If buying at the lumber/hardware store, what type of wood such as plywood, and it looks like 1″ or 3/4″ depth for the platforms?
Hey Christie! Some of that depends on how big your pup is. For small dogs I usually like to have my platforms elevated 2-3 inches. For medium-large dogs I like my platforms elevated 3-4 inches or so.
Oftentimes I stack my platforms to reach the desired height. For Sitting Platforms and Foot Targets I use dimensional lumber that is usually 1.5″ thick. I use ¾” for my Standing Platform to reduce the weight.
Does that answer your question?
Thank you for your blog! I was just wondering where you got the griptape from??
Hey Katie! The grip tape is pretty easy to source. My small local hardware store carries it, as do the big box stores like Lowe’s. It’s usually found in the safety isle.
Alternatively you can find it on Amazon or other similar online stores.
We finally got measurements and want to get what we need to build the platforms. We have 4 dogs and wondered if we could get by with just a couple of sizes. If you have an idea on that that would be great or what size we should go with if we are not doing 4 separate sets.
In the last response to someone you mentioned that you like to have the platforms elevated. Since I am not sure we would have enough boards to stack and reach the right height what do you recommend? Should we think about building feet and if so any ideas on the best direction to go on that? Thanks, the videos are great.
Reilly (border collie) 7 1/2″ W 36″ L
Jackson (border collie) 8 1/2″ W; 36″ L
Bisbee (Aussie) 10″ W; 36″ L
Caper (border collie) 6″ W; 28″ L
Hey Vicki!
Riley and Jackson can both probably share a 9 inch platform. Is Caper a baby? 6 inches seems a bit narrow. If so Caper may also be able to share the 9 inch platform until fully grown.
You can certainly add feet to the platforms. I usually like to have the platforms elevated 3-4 inches total (measured from the ground to the top of the platform). Having one foot that runs the front of the platform and another that runs the back of the platform might be an option… Maybe using a 1×1? Or you can use the other platforms under the standing platform to increase height. I show this in the Ipsilateral Step Up: Beginner exercise.
Hello !
Thanks for the videos. I decided to redo all my plateforms and so measured both my dogs and I am a little puzzled :
So far I have used a platform (not made to measure 100cm x30 cm) and as said measured bith dogs.
Width for my female aussie : 22 cm
Width for my male border collie : 15 cm
it feels really narrow compared to the previous plateform so I would like to make sure it is normal before i cut.
My Border tends to sit like Charlie Chaplin …
Hum…
Thanks in advance for your reply,
Kindly
Flo
Hey Florence!
That does seem pretty narrow. My Border Collie used a 25cm wide platform. Sometimes it’s helpful to measure the width between the hocks + the width between the stifles and then divide by 2 to get the average. This is particularly helpful when the dog has a tendency to abduct or externally rotate. If you want to email me a photo of your pup on the platform I’m happy to take a look (the blog module doesn’t allow attaching photos unfortunately).
What about young puppies and measurements when building platforms. If it fits today it will be to small in a few weeks. 🙈 Is it OK to build platforms for her to “grow in to”?
Hey Trude!
That’s actually a great question! And yes… I usually build one set of puppy platforms, and then another set once the pup is about 9 months old. We aren’t trying to ‘force’ baby puppies into a specific alignment… More we’re trying to teach them to be aware enough of their bodies to help the keep their limbs on the platform.
I started my Labrador puppy on a 9.5 inch wide platform (the width I use for my adult Border Collie… because that’s what I had lying around), and then once he started to outgrow that, I switched to an 11.5 inch wide platform.
If you want to share your puppy’s breed, I’m happy to make a ballpark suggestion.
can you give further detail or views of the rear foot target platform? is that a stand platform banked off a front foot target? I’m sure there is more detail on that here somewhere, but I must keep overlooking it and I’m not sure how that one is put together? I could bank a Cato board off the front foot target, but it would rock as pup walked across it so yours must be one unit / connected for stability. can you point me to the specifications?
Hey Rachel! Thats a great question! And you are correct… The platform used in the Rear Foot Targeting video is a Standing Platform (rear foot along the ground) propped up on a balance bar. The slight bit of elevation to the back edge is really helpful, as it helps the pup feel a proprioceptive change, without creating a lip or barrier which might discourage the pup from stepping back onto the platform.
more questions about foot targets. Front foot target : you have a board with a specific somewhat narrow width. I’m assuming this is for precision that I would not necessarily get if I just used a Cato board. is that correct? so, a piece of lumber, like a 2 X 4, will define foot placement more specifically than the Cato board, so the piece of lumber would be preferable. is my understanding correct?
rear foot target : blah. I’m just having a hard time understanding what I’m observing in the video / pictures. it looks like a broader surface propped across the front foot target. what did you use to keep it from ‘teeter-tottering’ down as puppy walked forward or backward across it? it is slanted. this is also a spot where I have used a Cato board (having puppy back up for rear foot target) Is there an advantage to the slanted set up? and if so, what is the best way to achieve a stable slant?
I feel silly barraging you with all these questions over the very first Puppy Exercise. I’m eager to get started after extended family illness. it will feel so good to move forward into something positive. I’m sure I’m over thinking. sorry! we’ve had a nightmare the past few months and I think my brain is stuck in crisis mode . . .maybe . . .