
Improving canine spine alignment, specifically addressing Swayback Posture, requires more than just generic exercises. A targeted approach, that retrains the postural muscles, and is integrated into your existing conditioning program is necessary if the goal is long-term alignment improvement and reduced injury risk.
In the Swayback Posture in Dogs: Understanding the Thoracic Sling blog post we unpacked the critical role of the thoracic sling in maintaining proper canine spine alignment. We learned that when this complex system of muscles that include the trapezius, rhomboid, serratus ventralis, and pectoralis becomes unbalanced, it can lead to thoracic hyperlordosis, or Swayback Posture. This postural deviation not only restricts scapular motion and disrupts joint kinematics but also leaves our dogs at an increased risk of injury to the entire forelimb complex.
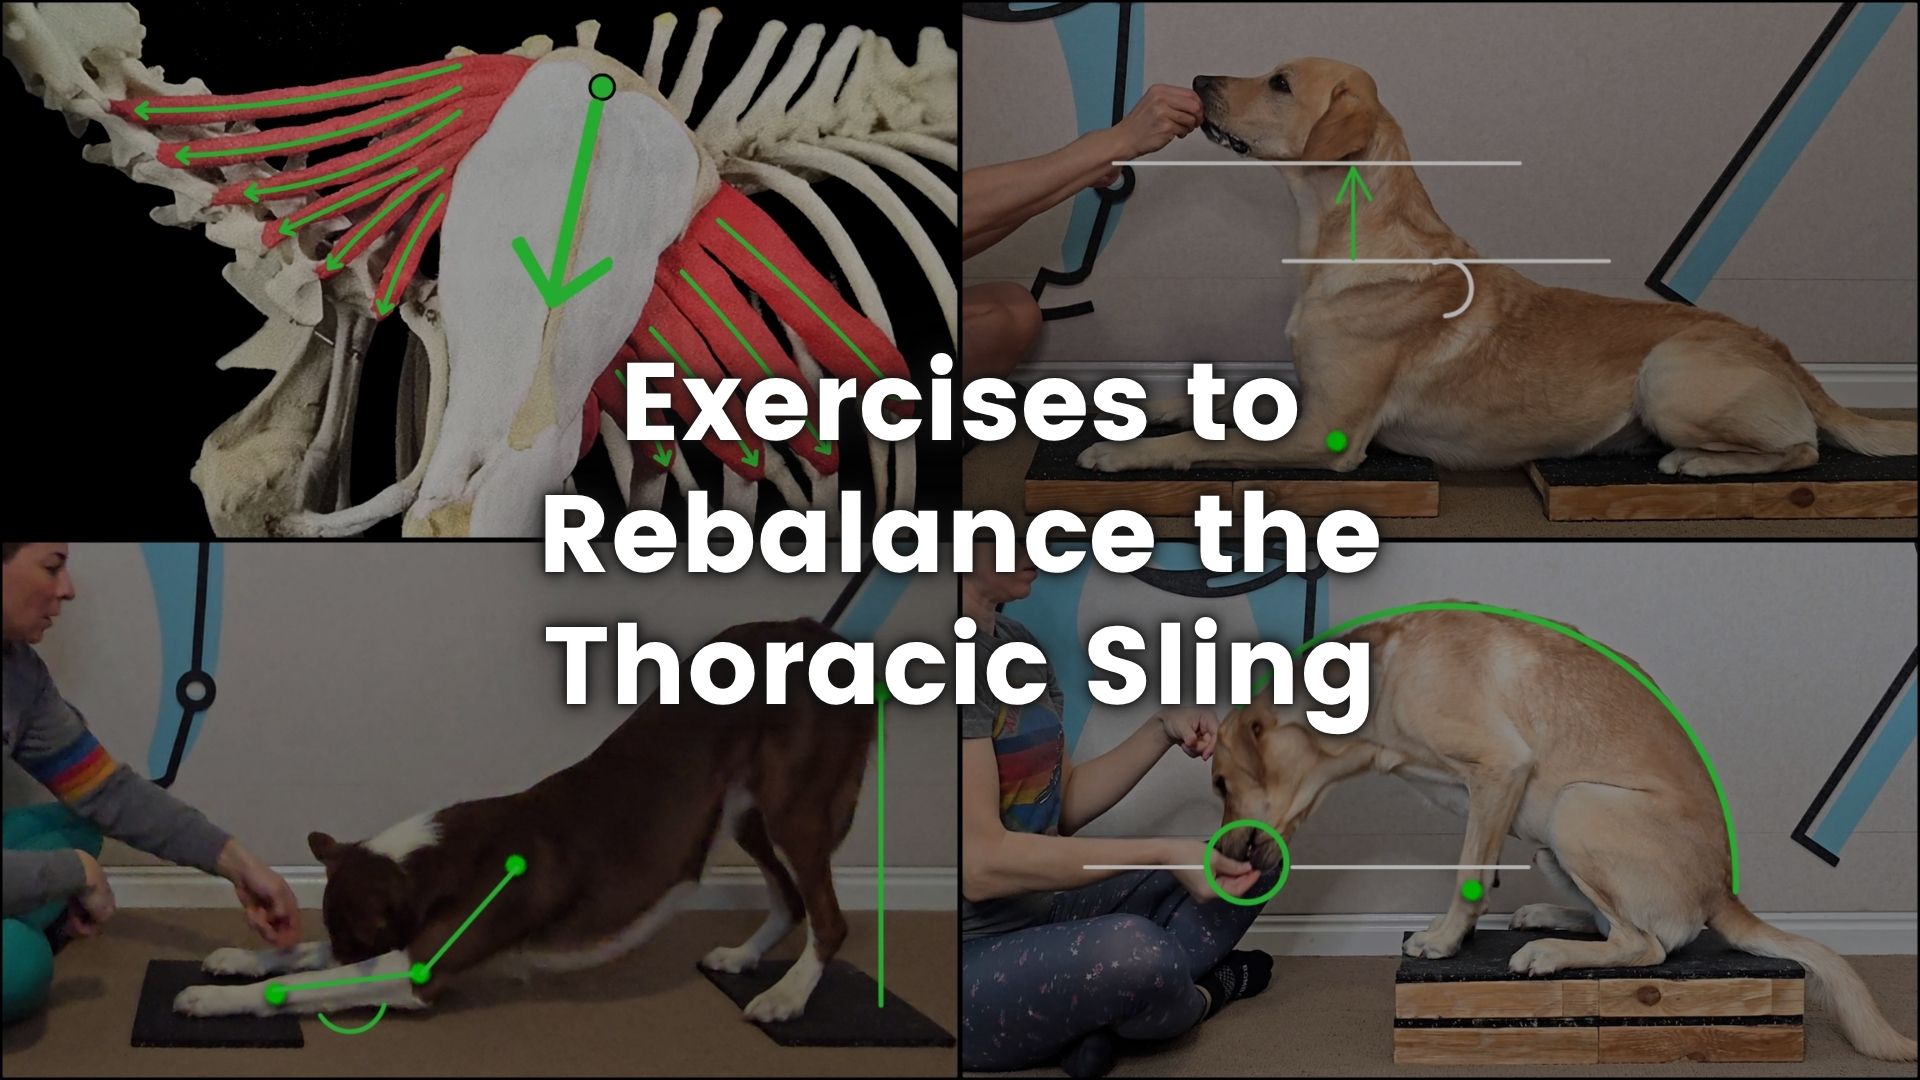
Now that we understand the mechanics of the thoracic sling, we can focus on practical, targeted conditioning exercises designed to strengthen, mobilize, and rebalance the thoracic sling, restoring your dog’s neutral spinal alignment and improving their overall movement quality.
———
Exercises to Improve Canine Spine Alignment
1. Scapular Push Up: Serratus Ventralis
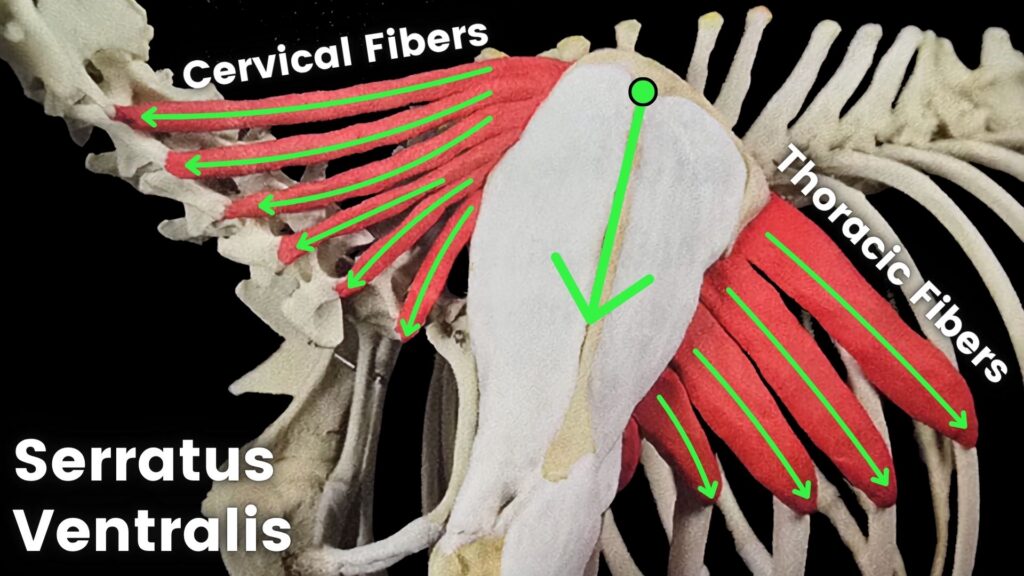
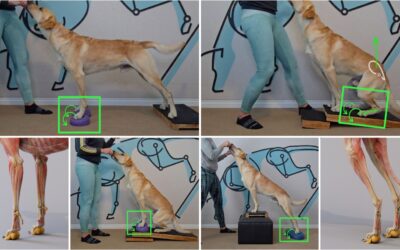
The Scapular Push Up is the most critical exercise needed to improve canine spine alignment, as it directly strengthens the Serratus Ventralis. The Serratus Ventralis is the only muscle that connects the scapula directly to the ribcage. When properly engaged, the Serratus Ventralis draws the scapulae downward, lifts the ribcage upward, and causes scapular protraction (abduction).
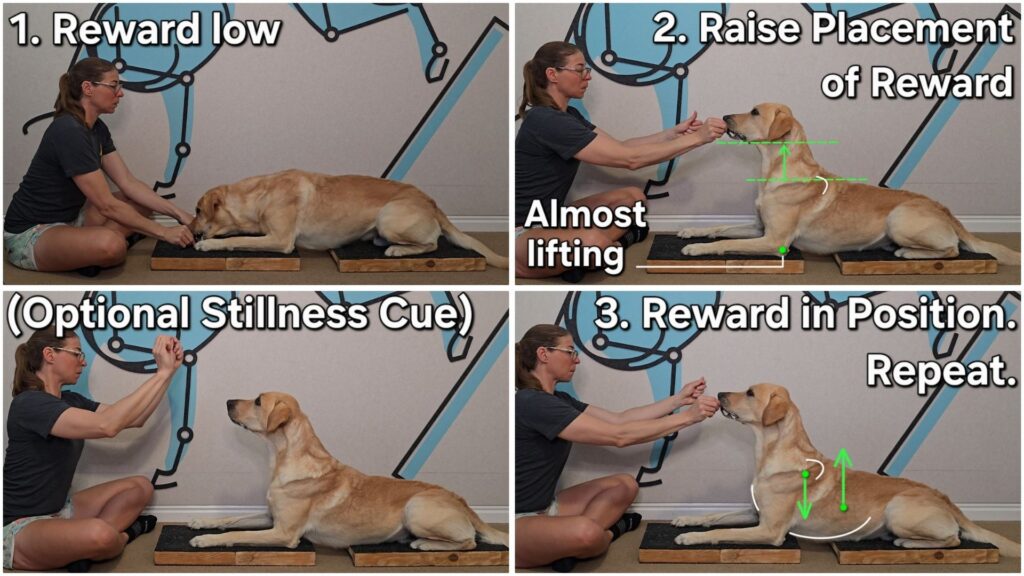
Equipment: 2 Sitting Platforms, or 1 Standing Platform
Start position: Posture Down
- Reward low, between the front feet to slacken the serratus ventralis.
- Adjust Placement of reward higher so that the elbow is almost lifting, and the underside of the jaw is well above the dorsal border of the scapula.
- Reward in position. Repeat.
Start with: 5 reps x 3 sets
Build to: Add Stillness. Hold each rep 10-20 seconds before rewarding.NOTE: In order to ensure serratus ventralis recruitment, Placement of Reward MUST be such that the underside of the jaw is well above the dorsal border of the scapula.
2. Seated Head Nod Down: Trapezius
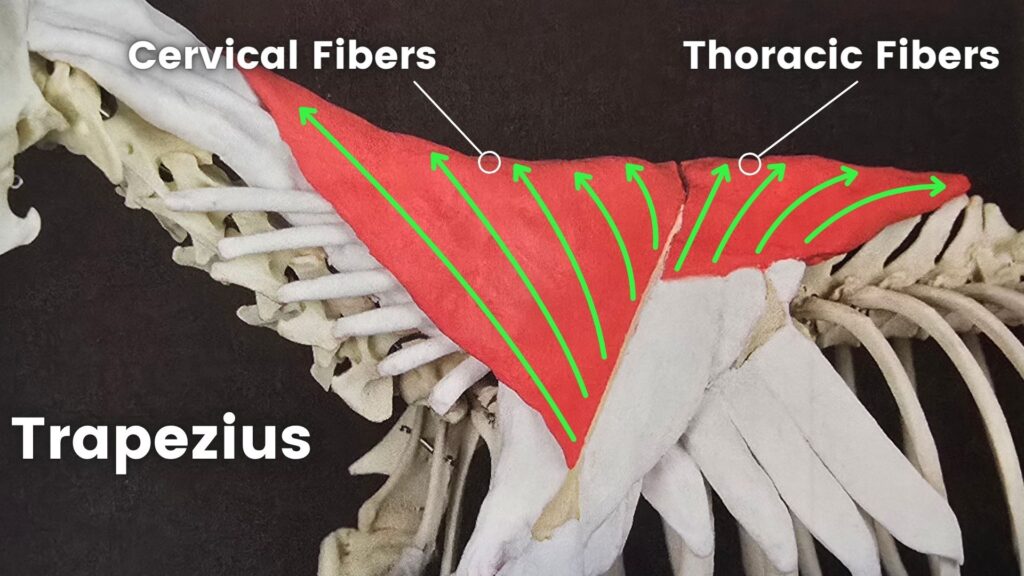
The Seated Head Nod Down targets trapezius mobility by flexing the spine while keeping the ribcage lifted. This lengthens the trapezius fibers along both the median plane (spine flexion) as well as on the transverse plane (scapular protraction / abduction). When the trapezius is properly mobilized, the ribcage is able to lift into position, reducing Swayback posture, and improving spine alignment.
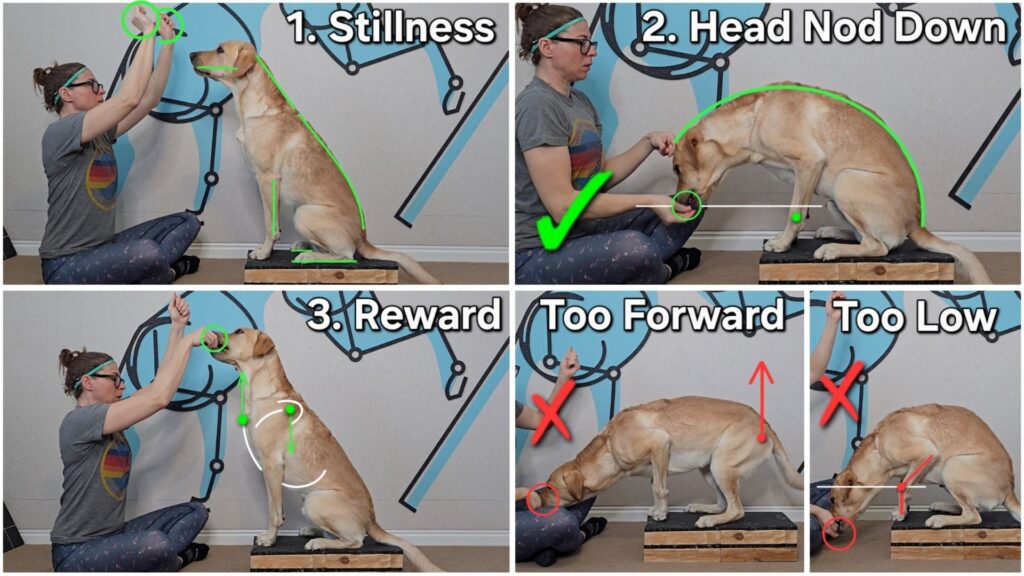
Equipment: 1 Sitting Platform
Start position: Posture Sit
- Cue Stillness in Posture Sit.
- Adjust Placement of Reward vertically downward to cue the Head Nod Down, reward in spine flexion, with the dog’s nose no lower than the carpus.
- Return to Posture Sit. Reward with the sternum lifting, and the scapulae depressing.
Start with: 5 reps x 3 sets
Build to: 10 reps x 3 setsNOTE: Unlike a Kick Back Stand, Handler Motion is vertically downward NOT toward the front feet. If the dog stands up, Placement of Reward is too far forward or the line of Handler Motion is incorrect. If the carpus breaks forward, Placement of Reward is too low.
3. Adducted Stand: Pectorals
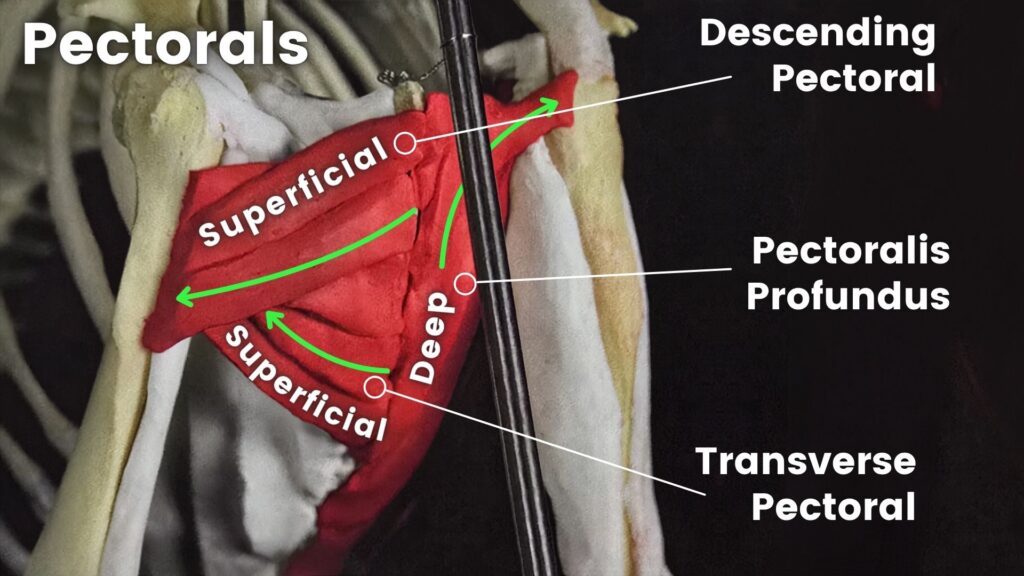
To further improve canine spine alignment, we will target the pectorals, both superficial (descending and transverse) and deep, using the Adducted Stand exercise. When the pectorals engage initially, the humerus is pulled inward toward the sternum (shoulder adduction), promoting indirect protraction of the scapulae (scapular abduction). Full pectoral engagement (emphasized by using 1 pod under the front feet) also encourages the ribcage to lift upward, reducing the thoracic lordosis typically seen in Swayback postural deviation.
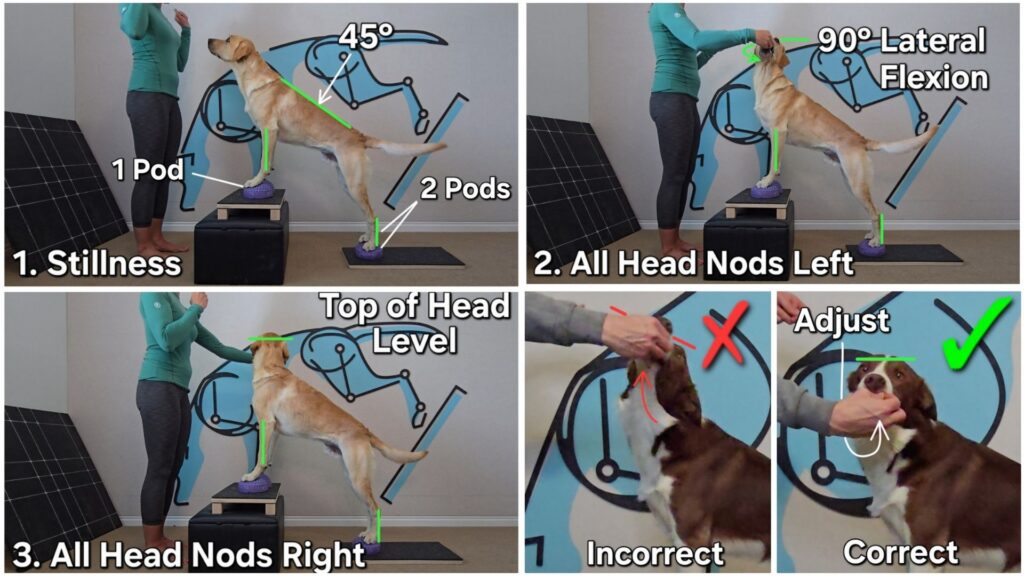
Equipment: 3 PawPods, Elevated Front Foot Target
Start position: Elevated Stand. Spine angle 45°.
- Cue Stillness in Adducted Stand 1 pod under front feet, 2 under rear.
- Adjust Placement of Reward horizontally to cue the Head Nods Left, aiming for 90° of lateral spine flexion. Complete all reps to the dog’s left.
- Repeat to the dog’s right.
Start with: 5 reps to the left, then 5 reps to the right. Release. 3 sets total
Build to: 5 reps x 3 sets remaining on the pods throughout.NOTE: During the Head Nods, the underside of the jaw should be well above the dorsal border of the scapula. If the head is too low, the pectorals won’t engage properly and we wont see the spine alignment improve in the intended way.
4. Bow: Rhomboids
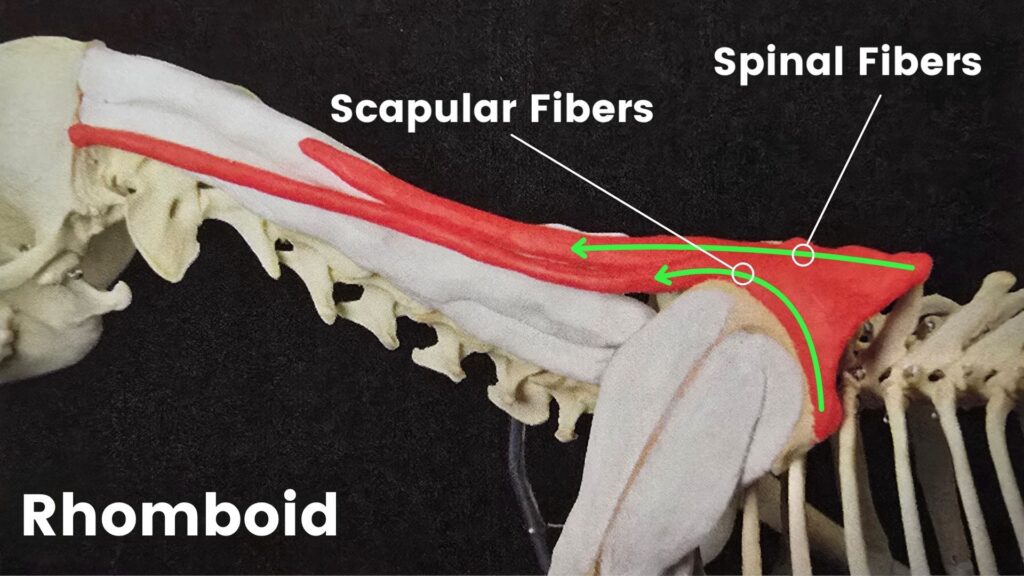
Lastly, we can use the Bow exercise to improve canine spine alignment, as it directly mobilizes the rhomboideus. When the rhomboids are tight or hypertonic, they pull the dorsal border of the scapula upward and forward, changing the scapular angle, and preventing the humerus from properly articulating. Mobilizing the rhomboideus shifts the dorsal border of the scapulae downward, neutralizing much of the thoracic hyperlordosis seen in Swayback postural deviation.
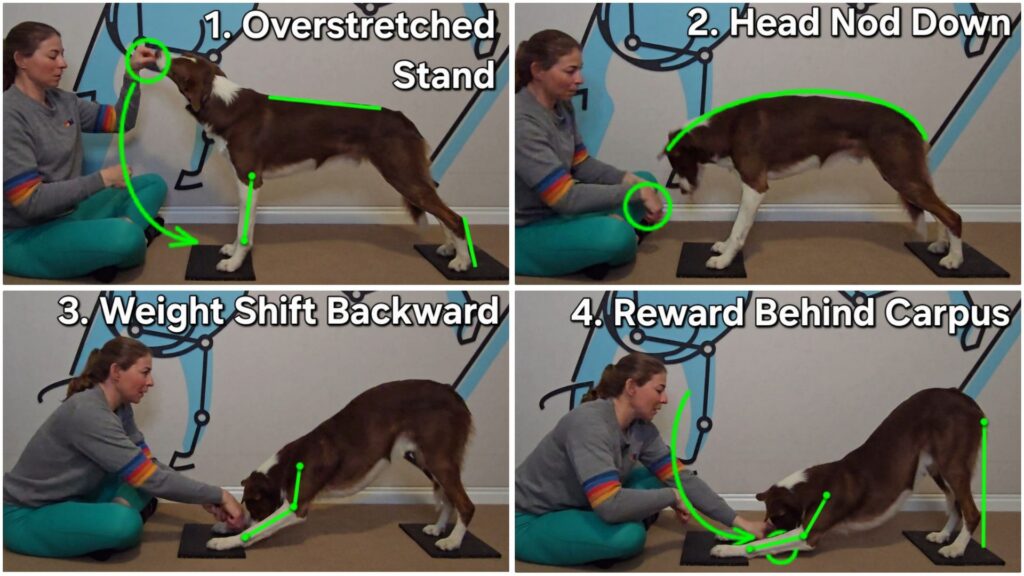
If the Bow exercise is going to be effective in improving spine alignment, it has to be executed properly (and normally it is not).
Equipment: 2 thin Foot Targets
Start position: Overstretched Stand.
- The dog MUST start in an Overstretched Stand
- Cue the Head Nod Down phase to promote spine flexion using Handler Motion following a curved pathway downward.
- Cue the weight shift backward phase continuing that curve toward the dog’s carpus.
- Reward behind the carpus, with the elbows lifted.
- Return to Stand.
Start with: 5 reps x 3 sets
Build to: 10 reps x 3 sets
NOTE: In order to improve spine alignment the elbows must remain lifted, with Placement of Reward encouraging the nose to face downward. This ensures maximal benefit, and prevents unintentional deepening of the thoracic hyperlordosis we are trying to improve.
———
Summary
Consistently incorporating these 4 targeted exercises is the most effective way to address muscle imbalances in the thoracic sling and improve canine spine alignment. By focusing on the serratus ventralis, trapezius, pectorals, and rhomboids, you can systematically rebalance the thoracic sling, address Swayback posture, and help restore the quality of your dog’s forelimb movement. Start slowly, prioritize proper form, and watch for gradual improvements in your dog’s alignment!
———
Struggling to teach the exercises listed here? Or looking to build a more robust foundation in canine fitness?
My Beginner Program could be your solution! The Beginner Program uses an evidence-based, step-by-step process that starts at the very foundation. With a strong focus on limb and spine alignment, body awareness, and teaching proper movement mechanics, my Beginner Program will prepare you (as the trainer) and your dog (as the learner) with the skills to easily and safely implement these more targeted exercises.
Alternatively, if you have a baby puppy, or pup under 8 months? Check out my Puppy Program for a safe, age appropriate path to improve body awareness, address alignment issues, and prepare your pup for these more advanced exercises in the future!!
NOTE: The Beginner Program and Puppy Program cover similar material, so your pup only needs to complete one, not both. The main difference is the Puppy Program is designed with a different skill order to accommodate a baby attention span, and a rapidly changing body. The Beginner Program assumes a certain amount of mental and physical maturity.
———
Frequently Asked Questions (FAQ)
How do I know if my dog has Swayback Posture (thoracic hyperlordosis)?
If the dorsal border of the scapulae (shoulder blades) aligns ABOVE the level of the spine, or if you see a distinct “dip” in the thoracic spine behind the withers, this may indicate Swayback Posture. A wide gap between the shoulder blades (“winging”) is often an early sign. For a step-by-step visual assessment guide, see this post Swayback Posture in Dogs: Understanding the Thoracic Sling.
Is Swayback Posture painful for my dog?
While Swayback Posture is a postural deviation rather than a disease process, it places significant stress on the forelimb assembly and thoracic spine. Over time, this muscle imbalance can lead to poor movement mechanics, restricted range of motion, and an increased risk of injury. Addressing these imbalances early can help prevent chronic discomfort.
How often should I practice these thoracic sling exercises?
Consistency is key to rebalancing the thoracic sling musculature. So along with following the reps x set progression detailed above, we also want to incorporate these alignment adjustments into ALL your existing conditioning exercises, and make them part of your reward criteria. Like anything in dog training, what’s rewarded will be repeated.
Can I combine these exercises with other conditioning programs?
Maybe. These exercises are designed to improve spine alignment, specifically targeting the thoracic sling. So it’s very likely these exercises will complement most existing fitness programs. However, if you’re working one-on-one with a fitness professional, or following a structured program already, it’s best to ask. If your dog is currently working through a specific rehab plan, or recovering from an injury, please consult with your rehab team to ensure these movements are appropriate for your dog’s specific recovery stage.
———
Additional Anatomy Resources
Like these cool anatomy images? Check out the book Bewegungsapparat Hund Funktionelle Anatomie, Biomechanik und Pathophysiologie by Mima Hohmann. It’s only available in German, but it’s an amazing resource. I read it using Google Lens, and the translation is pretty darn good! I would have no problem spending another $120 USD + shipping for an english translation. There’s an e book and PDF version available as well. It covers the canine gait, movement mechanics and movement flaws, functional anatomy, and more technical assessments.
0 Comments